
Welcome to my first tutorial! Today I will show you just how simple it can be to add a bandana on your ork, or any other model you so choose. Being the Freeboota Kaptain scourge of the galaxy that I am, I sculpt them on my ork boyz to give them a bit more of a pirate look.
Here are the materials I used:
your model (I used an Ork Nob specifically for this example)
Greenstuff
Hobby knife
Soft size 0 wedge colour shaper (though a flat bladed sculpting tool could work)
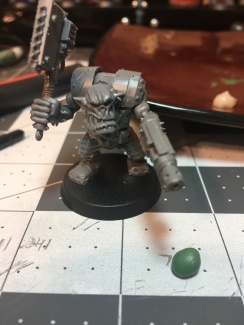 Here we see our ork and his soon-to-be bandana getting acquainted. Once mixed up, pull off a piece of greenstuff and roll it into a ball roughly the size shown; a little under the size of a pea. I never use an exact measurement as it can vary depending on the head you are placing it on. You want enough that it will smoothly cover the head but not look as though they are wearing a pillow. Once you have your ball, mush it right on the top of its head, making sure not to cover the eyes and keeping the coverage even over the entire top of the head.
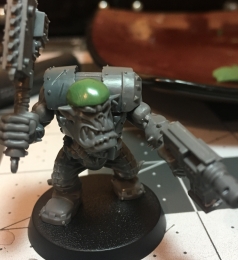
Once properly smushed onto his head, give it a smoothing out with your shaper or sculpting tool. I won’t go into a big long explanation on tools here, but I am a BIG fan of colour shapers. They make smoothing out greenstuff beyond easy, without a lot of reshaping of your original piece. That being said, if you are careful, any flat and lubricated sculpting tool should work. Once you place your greenstuff, you will constantly want to smooth out any fingerprints you get on it; and you will get them on it as you add the next two parts.


These are your next two pieces; the knot and the ends of the bandana. For the knot, you want just a small bit of greenstuff, rolled into a ball (seen in the picture on the left along the ruled edge). Carefully place it onto the side of the head, as close to the “back” as you can, and lightly press it in to give it a more oval shape. Once in place, take your hobby knife, lightly lubricate it to prevent sticking, and press a small “y” shape in it with the blade to create the look of the knot. After smoothing any fingerprints out, move to the end piece. The size of the piece you use is up to you; they can be longer or shorter but regardless of size, you want to press them into a somewhat flat diamond shape (seen in the picture on the right).
 One end of the diamond shape should be pressed lightly into the back of the knot to connect it, with the rest curved downward. Once in place, separate the piece into what will appear like two tail ends, using your hobby knife, leaving the outer side larger than the inner. Don’t cut all the way though, just score the shape of the outer tail end. This will help create the effect of one end overlapping the other. Press into the bottom of the piece with your knife, connecting with the existing separation to create the tips.
 Using your sculpting tool or shaper, press in on the inner end, flattening it out, while letting the outer tail end remain raised. Make sure that, while you want to flatten the inside end, you also want to maintain the shape of its inner edge. Once flattened, you should see it appear as if the outer end is laying overtop the side of the inner (see picture to the right). With the two ends formed, use your hobby knife once more and lightly press into the center of the outer bandana end, making an oval shape. Once created, use the tip of your tool to even out the newly created crevice, forming the fold.
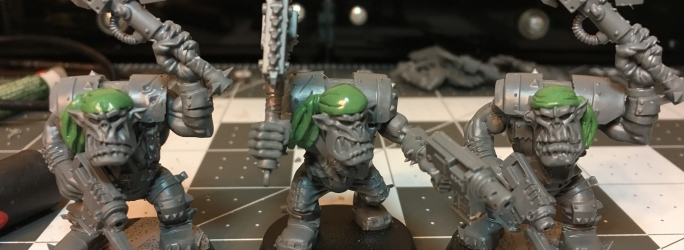
 At this point, you are mostly done! The final step is to add stretch points into the cap. Fabric would have some creases, being tied into a knot around the wearers head. Using your hobby knife, carefully make a make two or three lines, starting at the bottom of the cap and moving upward, connecting to the knot. The picture on the left shows that, for this example, I chose two lines. Do this for both sides of the knot. Once done, do a final smoothing to remove any lingering finger prints.

That is all there is to it! As you become comfortable, experiment with adding more creases into the cap or differences in the ends. It is an easy way to modify your miniature and add some uniqueness to them. Hopefully this has helped you, if you are looking to try this and as always, feel free to send me any questions or comments.
until next time 🙂
-Hobbyistgirl

Good tutorial. I have no use for bandanas, but I love reading any sculpting tutorial I can find just to get better 🙂
LikeLiked by 1 person
Thanks! Plenty more to come. I have to do my coats soon, so who knows…
LikeLiked by 1 person
Love it!
LikeLiked by 1 person
Great tutorial on the bandanas. I’ve done very little sculpting myself but you make these look very doable and the little touches like stretch marks really make it.
LikeLike
Thanks, Joe! It is really easy. Like a lot of greenstuff work, half the battle is just diving in and doing it. after the 3rd of 4th one, you’ll start to do minor tweaks to add a little more life into each sculpt. It really adds a personal touch to a figure 🙂
LikeLike
I have orks to put together and pirate orks would be better orks. Thanks for sharing this.
LikeLike
More tutoriallllssssssss
LikeLiked by 1 person